
Notice
Recent Posts
Recent Comments
Link
| 일 | 월 | 화 | 수 | 목 | 금 | 토 |
|---|---|---|---|---|---|---|
| 1 | 2 | 3 | 4 | 5 | 6 | 7 |
| 8 | 9 | 10 | 11 | 12 | 13 | 14 |
| 15 | 16 | 17 | 18 | 19 | 20 | 21 |
| 22 | 23 | 24 | 25 | 26 | 27 | 28 |
| 29 | 30 | 31 |
Tags
- JavaScript
- scrollview
- JS
- button
- Linux
- array
- Hook
- TextView
- Javscript
- Android
- 스프링부트
- npm
- Java
- nodejs
- SpringBoot
- TypeScript
- 자바스크립트
- 리액트
- 코틀린
- 안드로이드
- 랜덤넘버
- RecyclerView
- 오버라이딩
- Kotlin
- GoogleMaps
- 구글맵스
- stylesheet
- fragment
- React
- 랜덤번호
Archives
- Today
- Total
타닥타닥 개발자의 일상
Kotlin 코틀린 Fragment 이용하여 안드로이드 화면 전환하고 Fragment에 아이콘 삽입하기 본문
파일 및 폴더 구성
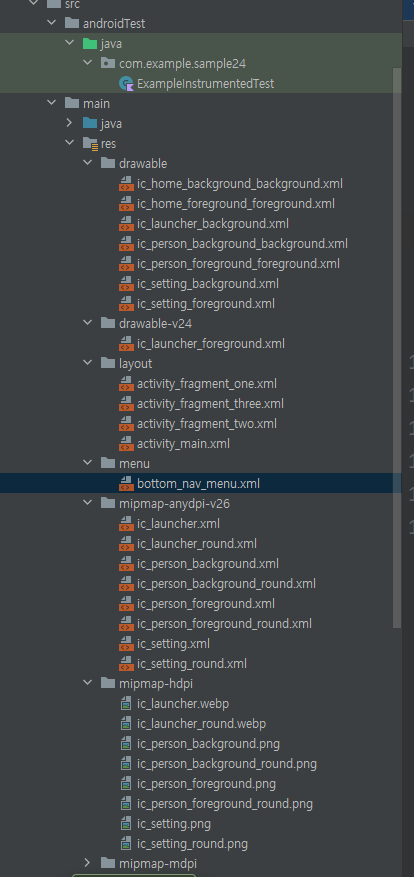
drawble폴더에 ic_person_.xml, ic_s
etting_.xml, ic_home.xml 생성 >
생성 방법 : drawable 폴더 우클릭 >새로 만들기 >Image Asset>

Layer Name에서 이름 설정.
Clip Art 클릭해서 원하는 이미지 설정.
모두 완료하면 다음버튼 클릭

이와 같은 식으로 home, setting, person 아이콘 xml을 생성한다.
수업시간에 졸아서 왜 아이콘 별로 forground 랑 background 했는지 기억이 안난다.


저렇게 생성하면 mimap-hdpi 폴더 안의 파일들이 자동 생성된다.
그 외에도 layout 폴더에 activity_fragment.xml파일 차례로 생성.
menu 폴더에 bottom_nav_menu.xml 파일 생성

com.example.sample24 파일에
FragmentOne
FragmentTwo
FragmentThree
코틀린 클래스 생성
activity_fragment_one.xml
<?xml version="1.0" encoding="utf-8"?>
<androidx.constraintlayout.widget.ConstraintLayout
        xmlns:android="http://schemas.android.com/apk/res/android"
        xmlns:tools="http://schemas.android.com/tools"
        xmlns:app="http://schemas.android.com/apk/res-auto"
        android:layout_width="match_parent"
        android:layout_height="match_parent">

    <TextView
            android:text="First Fragment"
            android:textSize="30sp"
            android:layout_width="wrap_content"
            android:layout_height="wrap_content"
            app:layout_constraintStart_toStartOf="parent"
            app:layout_constraintEnd_toEndOf="parent"
            app:layout_constraintBottom_toBottomOf="parent"
            app:layout_constraintTop_toTopOf="parent"/>

</androidx.constraintlayout.widget.ConstraintLayout>
activity_fragment_two.xml
<?xml version="1.0" encoding="utf-8"?>
<androidx.constraintlayout.widget.ConstraintLayout
        xmlns:android="http://schemas.android.com/apk/res/android"
        xmlns:tools="http://schemas.android.com/tools"
        xmlns:app="http://schemas.android.com/apk/res-auto"
        android:background="#0000ff"
        android:layout_width="match_parent"
        android:layout_height="match_parent">

    <TextView
            android:text="Second Fragment"
            android:textSize="30sp"
            android:layout_width="wrap_content"
            android:layout_height="wrap_content"
            app:layout_constraintStart_toStartOf="parent"
            app:layout_constraintEnd_toEndOf="parent"
            app:layout_constraintBottom_toBottomOf="parent"
            app:layout_constraintTop_toTopOf="parent"/>

</androidx.constraintlayout.widget.ConstraintLayout>
activity_fragment_three.xml
<?xml version="1.0" encoding="utf-8"?>
<androidx.constraintlayout.widget.ConstraintLayout
        xmlns:android="http://schemas.android.com/apk/res/android"
        xmlns:tools="http://schemas.android.com/tools"
        xmlns:app="http://schemas.android.com/apk/res-auto"
        android:background="#ff0000"
        android:layout_width="match_parent"
        android:layout_height="match_parent">

    <TextView
            android:text="Third Fragment"
            android:textSize="30sp"
            android:layout_width="wrap_content"
            android:layout_height="wrap_content"
            app:layout_constraintStart_toStartOf="parent"
            app:layout_constraintEnd_toEndOf="parent"
            app:layout_constraintBottom_toBottomOf="parent"
            app:layout_constraintTop_toTopOf="parent"/>

</androidx.constraintlayout.widget.ConstraintLayout>
bottom_nav_menu.xml
<?xml version="1.0" encoding="utf-8"?>
<menu xmlns:android="http://schemas.android.com/apk/res/android">
    <item android:id="@+id/person"
          android:title="Person"
          android:icon="@drawable/ic_person_foreground_foreground"/>

    <item android:id="@+id/home"
          android:title="Home"
          android:icon="@drawable/ic_home_foreground_foreground"/>

    <item android:id="@+id/setting"
          android:title="Setting"
          android:icon="@drawable/ic_setting_foreground"/>

</menu>
build.gradle(:app)
plugins {
    id 'com.android.application'
    id 'kotlin-android'
    id 'kotlin-android-extensions' //추가된 부분

}

android {
    compileSdk 32

    defaultConfig {
        applicationId "com.example.sample24"
        minSdk 21
        targetSdk 32
        versionCode 1
        versionName "1.0"

        testInstrumentationRunner "androidx.test.runner.AndroidJUnitRunner"
    }

    buildTypes {
        release {
            minifyEnabled false
            proguardFiles getDefaultProguardFile('proguard-android-optimize.txt'), 'proguard-rules.pro'
        }
    }
    compileOptions {
        sourceCompatibility JavaVersion.VERSION_1_8
        targetCompatibility JavaVersion.VERSION_1_8
    }
    kotlinOptions {
        jvmTarget = '1.8'
    }
}

dependencies {
    implementation 'com.google.android.material:material:1.2.0' //추가된 부분

    implementation 'androidx.core:core-ktx:1.7.0'
    implementation 'androidx.appcompat:appcompat:1.4.1'
    implementation 'com.google.android.material:material:1.5.0'
    implementation 'androidx.constraintlayout:constraintlayout:2.1.3'

    testImplementation 'junit:junit:4.+'
    androidTestImplementation 'androidx.test.ext:junit:1.1.3'
    androidTestImplementation 'androidx.test.espresso:espresso-core:3.4.0'
}
activity_main.xml
<?xml version="1.0" encoding="utf-8"?>
<androidx.constraintlayout.widget.ConstraintLayout
        xmlns:android="http://schemas.android.com/apk/res/android"
        xmlns:tools="http://schemas.android.com/tools"
        xmlns:app="http://schemas.android.com/apk/res-auto"
        android:layout_width="match_parent"
        android:layout_height="match_parent"
        tools:context=".MainActivity">

    <FrameLayout
            android:id="@+id/flFragment"
            android:layout_width="match_parent"
            android:layout_height="0dp"
            app:layout_constraintBottom_toTopOf="@+id/bottomNaviView"
            app:layout_constraintEnd_toEndOf="parent"
            app:layout_constraintHorizontal_bias="0.5"
            app:layout_constraintStart_toStartOf="parent"
            app:layout_constraintTop_toTopOf="parent">
    </FrameLayout>


    <com.google.android.material.bottomnavigation.BottomNavigationView
            android:id="@+id/bottomNaviView"
            android:layout_width="match_parent"
            android:layout_height="75dp"
            app:layout_constraintBottom_toBottomOf="parent"
            app:layout_constraintEnd_toEndOf="parent"
            app:layout_constraintHorizontal_bias="0.5"
            app:layout_constraintStart_toStartOf="parent"
            app:menu="@menu/bottom_nav_menu"
    />


</androidx.constraintlayout.widget.ConstraintLayout>
activity_fragment_one.xml
<?xml version="1.0" encoding="utf-8"?>
<androidx.constraintlayout.widget.ConstraintLayout
        xmlns:android="http://schemas.android.com/apk/res/android"
        xmlns:tools="http://schemas.android.com/tools"
        xmlns:app="http://schemas.android.com/apk/res-auto"
        android:layout_width="match_parent"
        android:layout_height="match_parent">

    <TextView
            android:text="First Fragment"
            android:textSize="30sp"
            android:layout_width="wrap_content"
            android:layout_height="wrap_content"
            app:layout_constraintStart_toStartOf="parent"
            app:layout_constraintEnd_toEndOf="parent"
            app:layout_constraintBottom_toBottomOf="parent"
            app:layout_constraintTop_toTopOf="parent"/>

</androidx.constraintlayout.widget.ConstraintLayout>
activity_fragment_two.xml
<?xml version="1.0" encoding="utf-8"?>
<androidx.constraintlayout.widget.ConstraintLayout
        xmlns:android="http://schemas.android.com/apk/res/android"
        xmlns:tools="http://schemas.android.com/tools"
        xmlns:app="http://schemas.android.com/apk/res-auto"
        android:background="#0000ff"
        android:layout_width="match_parent"
        android:layout_height="match_parent">

    <TextView
            android:text="Second Fragment"
            android:textSize="30sp"
            android:layout_width="wrap_content"
            android:layout_height="wrap_content"
            app:layout_constraintStart_toStartOf="parent"
            app:layout_constraintEnd_toEndOf="parent"
            app:layout_constraintBottom_toBottomOf="parent"
            app:layout_constraintTop_toTopOf="parent"/>

</androidx.constraintlayout.widget.ConstraintLayout>
activity_fragment_three.xml
<?xml version="1.0" encoding="utf-8"?>
<androidx.constraintlayout.widget.ConstraintLayout
        xmlns:android="http://schemas.android.com/apk/res/android"
        xmlns:tools="http://schemas.android.com/tools"
        xmlns:app="http://schemas.android.com/apk/res-auto"
        android:background="#ff0000"
        android:layout_width="match_parent"
        android:layout_height="match_parent">

    <TextView
            android:text="Third Fragment"
            android:textSize="30sp"
            android:layout_width="wrap_content"
            android:layout_height="wrap_content"
            app:layout_constraintStart_toStartOf="parent"
            app:layout_constraintEnd_toEndOf="parent"
            app:layout_constraintBottom_toBottomOf="parent"
            app:layout_constraintTop_toTopOf="parent"/>

</androidx.constraintlayout.widget.ConstraintLayout>
FragmentOne.kt
package com.example.sample24

import android.os.Bundle
import android.view.LayoutInflater
import android.view.View
import android.view.ViewGroup
import androidx.fragment.app.Fragment

class FragmentOne: Fragment(R.layout.activity_fragment_one) {

    }
FragmentTwo.kt
package com.example.sample24

import android.os.Bundle
import android.view.LayoutInflater
import android.view.View
import android.view.ViewGroup
import androidx.fragment.app.Fragment

class FragmentTwo: Fragment(R.layout.activity_fragment_two) {

}
FragmentThree.kt
package com.example.sample24

import android.os.Bundle
import android.view.LayoutInflater
import android.view.View
import android.view.ViewGroup
import androidx.fragment.app.Fragment

class FragmentThree: Fragment(R.layout.activity_fragment_three) {

}
MainActivity.kt
package com.example.sample24

import androidx.appcompat.app.AppCompatActivity
import android.os.Bundle
import androidx.fragment.app.Fragment
import kotlinx.android.synthetic.main.activity_main.*

class MainActivity : AppCompatActivity() {
    override fun onCreate(savedInstanceState: Bundle?) {
        super.onCreate(savedInstanceState)
        setContentView(R.layout.activity_main)

        val firstFragment = FragmentOne()
        val secondFragment = FragmentTwo()
        val thirdFragment = FragmentThree()

        setCurrentFragment(firstFragment)

        bottomNaviView.setOnNavigationItemSelectedListener {
            when(it.itemId){
                R.id.person->setCurrentFragment(firstFragment)
                R.id.home->setCurrentFragment(secondFragment)
                R.id.setting->setCurrentFragment(thirdFragment)
            }
            true
        }
    }

    fun setCurrentFragment(fragment: Fragment)=
        supportFragmentManager.beginTransaction().apply {
            replace(R.id.flFragment,fragment)
            commit()
        }

}
결과


'코딩 기록 > Kotlin' 카테고리의 다른 글
| kotlin 코틀린 안드로이드 화면에 이미지 버튼 구현하기, 버튼 클릭시 알림창 뜨게 하기 (0) | 2022.02.08 |
|---|---|
| 코틀린 Kotlin seekbar / ratingbar (별점) 안드로이드 화면에 나타내고 textview랑 연결하기 (0) | 2022.02.08 |
| Kotlin Fragment 기능 이용해서 안드로이드 화면에 상단 메뉴 만들고 선택에 따라서 화면전환 하기 (1) | 2022.02.07 |
| Kotlin 안드로이드 화면에 WebView이용해서 html 문서 연결하고 구현화면 버튼 클릭시 알림창 띄우기 (0) | 2022.02.07 |
| Kotlin 안드로이드 화면에 videoView이용해 동영상 삽입하기 (0) | 2022.02.07 |
'코딩 기록/Kotlin' Related Articles
more


Comments