
Notice
Recent Posts
Recent Comments
Link
| 일 | 월 | 화 | 수 | 목 | 금 | 토 |
|---|---|---|---|---|---|---|
| 1 | 2 | 3 | 4 | 5 | 6 | |
| 7 | 8 | 9 | 10 | 11 | 12 | 13 |
| 14 | 15 | 16 | 17 | 18 | 19 | 20 |
| 21 | 22 | 23 | 24 | 25 | 26 | 27 |
| 28 | 29 | 30 | 31 |
Tags
- 안드로이드
- 랜덤넘버
- fragment
- 구글맵스
- array
- Android
- JS
- Java
- npm
- TextView
- 스프링부트
- 리액트
- JavaScript
- stylesheet
- 코틀린
- 랜덤번호
- GoogleMaps
- React
- SpringBoot
- nodejs
- RecyclerView
- Linux
- Hook
- button
- 오버라이딩
- Kotlin
- Javscript
- 자바스크립트
- TypeScript
- scrollview
Archives
- Today
- Total
타닥타닥 개발자의 일상
Kotlin 안드로이드 화면에 WebView이용해서 html 문서 연결하고 구현화면 버튼 클릭시 알림창 띄우기 본문
코딩 기록/Kotlin
Kotlin 안드로이드 화면에 WebView이용해서 html 문서 연결하고 구현화면 버튼 클릭시 알림창 띄우기
NomadHaven 2022. 2. 7. 17:52파일 및 폴더 구성

main 폴더에 assets폴더 생성.
생성된 assets폴더 우클릭 >디렉터리를 다음으로 표시 > 리소스루트 로 설정
설정된 assets 폴더에 html파일 저장
assets폴더에 저장된 hello.html 파일
<!DOCTYPE html>
<html>
<head>
<meta charset="UTF-8">
<title>안녕</title>
<script type="text/javascript">
window.onload=function(){
var c = document.getElementById('c');
c.style.background='yellow';
};
</script>
</head>
<body>
<div id="c">
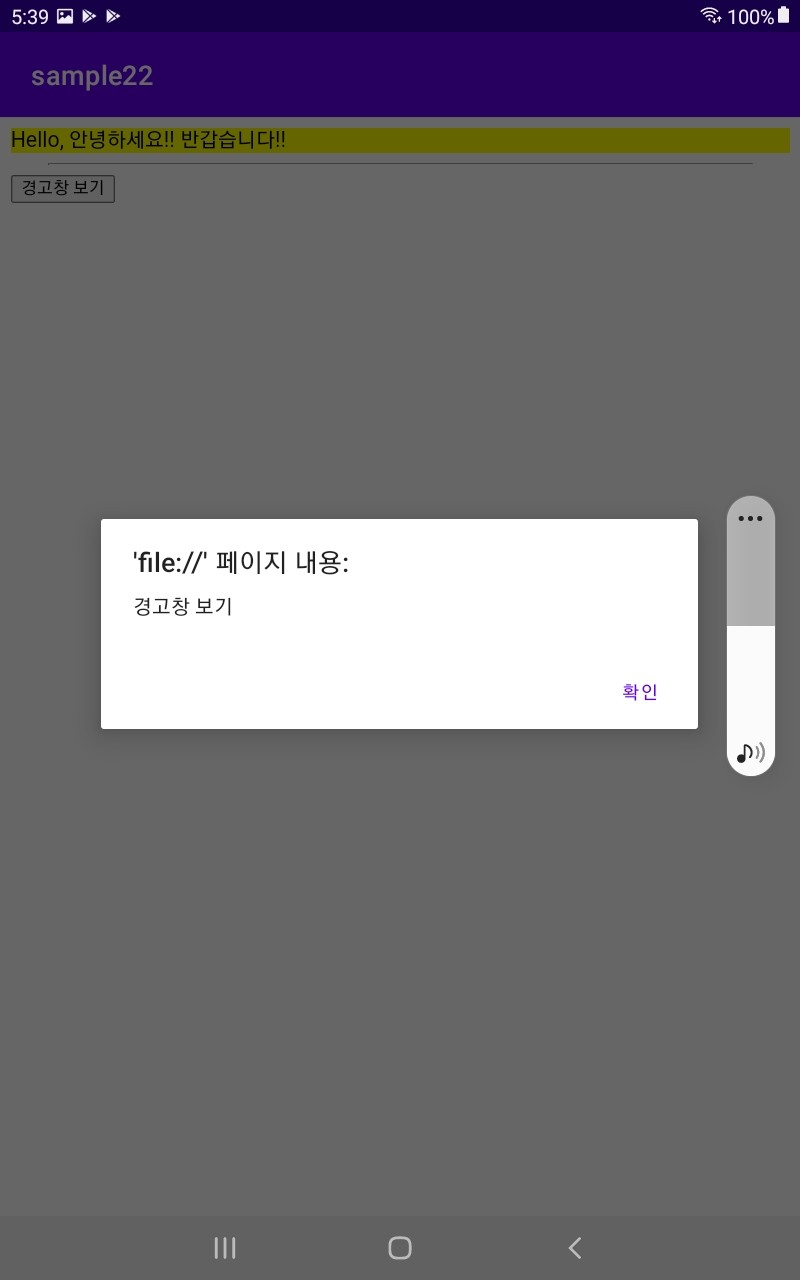
Hello, 안녕하세요!! 반갑습니다!!
</div>
<hr size="1" width="90%">
<input type="button" value="경고창 보기" onclick="alert('경고창 보기');">
</body>
</html>
AndroidManifest.xml
<?xml version="1.0" encoding="utf-8"?>
<manifest xmlns:android="http://schemas.android.com/apk/res/android"
          package="com.example.sample22">
    <uses-permission android:name="android.permission.INTERNET" />
    //인터넷 연결을 허용하는 permission 코드 삽입

    <application
            android:allowBackup="true"
            android:icon="@mipmap/ic_launcher"
            android:label="@string/app_name"
            android:roundIcon="@mipmap/ic_launcher_round"
            android:supportsRtl="true"
            android:theme="@style/Theme.Sample22">
        <activity
                android:name=".MainActivity"
                android:exported="true">
            <intent-filter>
                <action android:name="android.intent.action.MAIN"/>

                <category android:name="android.intent.category.LAUNCHER"/>
            </intent-filter>
        </activity>
    </application>

</manifest>
activity_main.xml
<?xml version="1.0" encoding="utf-8"?>
<androidx.constraintlayout.widget.ConstraintLayout
        xmlns:android="http://schemas.android.com/apk/res/android"
        xmlns:tools="http://schemas.android.com/tools"
        xmlns:app="http://schemas.android.com/apk/res-auto"
        android:layout_width="match_parent"
        android:layout_height="match_parent"
        tools:context=".MainActivity">

    <WebView
            android:id="@+id/webView"
            android:layout_width="match_parent"
            android:layout_height="match_parent"
            app:layout_constraintTop_toTopOf="parent"
            app:layout_constraintStart_toStartOf="parent"
            app:layout_constraintEnd_toEndOf="parent"
            app:layout_constraintBottom_toBottomOf="parent"/>
</androidx.constraintlayout.widget.ConstraintLayout>
MainActivity.kt
package com.example.sample22

import androidx.appcompat.app.AppCompatActivity
import android.os.Bundle
import android.webkit.WebChromeClient
import android.webkit.WebView

class MainActivity : AppCompatActivity() {
    override fun onCreate(savedInstanceState: Bundle?) {
        super.onCreate(savedInstanceState)
        setContentView(R.layout.activity_main)

        val webView = findViewById<WebView>(R.id.webView)

/*
        //1.url
        webView.loadUrl("https://m.naver.com")

        //2.html코드 작성
      	 val html = "<html><head><meta charset=\"UTF-8\"></head><body>Hello World! 안녕하세요!</body></html>"
        webView.loadData(html, "text/html", "UTF-8")
*/
        //3.html 문서 호출
        webView.loadUrl("file:///android_asset/hello.html")//html파일의경로통해 해당 파일 호출

        webView.settings.javaScriptEnabled=true

        webView.webChromeClient = WebChromeClient()


    }
}
결과화면

'코딩 기록 > Kotlin' 카테고리의 다른 글
| Kotlin 코틀린 Fragment 이용하여 안드로이드 화면 전환하고 Fragment에 아이콘 삽입하기 (1) | 2022.02.08 |
|---|---|
| Kotlin Fragment 기능 이용해서 안드로이드 화면에 상단 메뉴 만들고 선택에 따라서 화면전환 하기 (1) | 2022.02.07 |
| Kotlin 안드로이드 화면에 videoView이용해 동영상 삽입하기 (0) | 2022.02.07 |
| Kotlin 정렬된 grid 안드로이드 화면에 표시하기, grid에서 선택한 사항 textview랑 연결하기 (0) | 2022.02.07 |
| ScrollView / TableLayout 이용하여 스크롤 가능한 안드로이드 화면 만들기 (0) | 2022.02.07 |
'코딩 기록/Kotlin' Related Articles
more


Comments