
Notice
Recent Posts
Recent Comments
Link
| 일 | 월 | 화 | 수 | 목 | 금 | 토 |
|---|---|---|---|---|---|---|
| 1 | 2 | 3 | 4 | 5 | 6 | |
| 7 | 8 | 9 | 10 | 11 | 12 | 13 |
| 14 | 15 | 16 | 17 | 18 | 19 | 20 |
| 21 | 22 | 23 | 24 | 25 | 26 | 27 |
| 28 | 29 | 30 | 31 |
Tags
- RecyclerView
- 코틀린
- JS
- nodejs
- 스프링부트
- array
- TextView
- button
- 오버라이딩
- SpringBoot
- Java
- 랜덤번호
- Linux
- stylesheet
- React
- Android
- npm
- scrollview
- 랜덤넘버
- TypeScript
- Hook
- 구글맵스
- Kotlin
- GoogleMaps
- fragment
- 자바스크립트
- Javscript
- 안드로이드
- JavaScript
- 리액트
Archives
- Today
- Total
타닥타닥 개발자의 일상
Kotlin 안드로이드 화면에 recyclerView 사용해서 프로필 목록 만들고 프로필 클릭시 상세 화면 전환하기 본문
코딩 기록/Kotlin
Kotlin 안드로이드 화면에 recyclerView 사용해서 프로필 목록 만들고 프로필 클릭시 상세 화면 전환하기
NomadHaven 2022. 2. 9. 16:25파일 및 폴더 구성

com.example.sample30 : CustomAdapter.kt / DataVo / MainActivity / ProfileDetailActivity 생성
drawble 폴더 : 프로필 사진으로 사용할 choi.png / kim.png / park.png 이미지 저장
layout 폴더 : activity_profile_detail.xml / veiw_item_layout.xml 생성
AndroidManifest.xml
<?xml version="1.0" encoding="utf-8"?>
<manifest xmlns:android="http://schemas.android.com/apk/res/android"
package="com.example.sample30">
<application
android:allowBackup="true"
android:icon="@mipmap/ic_launcher"
android:label="@string/app_name"
android:roundIcon="@mipmap/ic_launcher_round"
android:supportsRtl="true"
android:theme="@style/Theme.Sample30">
<!-- <activity
android:name=".ProfileDetailActivity"
android:exported="true"
android:label="@string/title_activity_profile_detail"
android:theme="@style/Theme.Sample30.NoActionBar"/>-->
<activity
android:name=".MainActivity"
android:exported="true">
<intent-filter>
<action android:name="android.intent.action.MAIN"/>
<category android:name="android.intent.category.LAUNCHER"/>
</intent-filter>
</activity>
<activity android:name=".ProfileDetailActivity"/> <!--새로 추가한 부분-->
</application>
</manifest>activity_main.xml
<?xml version="1.0" encoding="utf-8"?>
<androidx.constraintlayout.widget.ConstraintLayout
        xmlns:android="http://schemas.android.com/apk/res/android"
        xmlns:tools="http://schemas.android.com/tools"
        xmlns:app="http://schemas.android.com/apk/res-auto"
        android:layout_width="match_parent"
        android:layout_height="match_parent"
        tools:context=".MainActivity">

    <androidx.recyclerview.widget.RecyclerView
            android:id="@+id/recyclerView"
            android:layout_width="match_parent"
            android:layout_height="680dp"
            app:layout_constraintLeft_toLeftOf="parent"
            app:layout_constraintRight_toRightOf="parent"
            app:layout_constraintEnd_toEndOf="parent"
            app:layout_constraintTop_toTopOf="parent"
    />
</androidx.constraintlayout.widget.ConstraintLayout>
RecyclerView 생성

activity_profile_detail.xml (프로필 클릭했을때 이동하는 상세화면 구성)
<?xml version="1.0" encoding="utf-8"?>
<androidx.constraintlayout.widget.ConstraintLayout
        xmlns:android="http://schemas.android.com/apk/res/android"
        xmlns:tools="http://schemas.android.com/tools"
        xmlns:app="http://schemas.android.com/apk/res-auto"
        android:layout_width="match_parent"
        android:layout_height="match_parent"
        tools:context=".ProfileDetailActivity">


    <ImageView //프로필 이미지 전시할 공간
            android:layout_width="108dp"
            android:layout_height="108dp"
            tools:srcCompat="@tools:sample/avatars"
            android:id="@+id/img_profile"
            app:layout_constraintTop_toTopOf="parent"
            app:layout_constraintBottom_toBottomOf="parent"
            app:layout_constraintStart_toStartOf="parent"
            app:layout_constraintEnd_toEndOf="parent"
            app:layout_constraintVertical_bias="0.176"/>
    <TextView
            android:text="이름"
            android:layout_width="236dp"
            android:layout_height="47dp"
            android:id="@+id/user_name"
            android:textSize="20dp"
            android:gravity="center"
            app:layout_constraintTop_toTopOf="parent"
            app:layout_constraintBottom_toBottomOf="parent"
            app:layout_constraintEnd_toEndOf="parent"
            app:layout_constraintStart_toStartOf="parent"
            app:layout_constraintHorizontal_bias="0.502"
            app:layout_constraintVertical_bias="0.378"/>
    <TextView
            android:text="ID"
            android:layout_width="236dp"
            android:layout_height="47dp"
            android:id="@+id/user_id"
            android:textSize="20dp"
            android:gravity="center"
            app:layout_constraintTop_toTopOf="parent"
            app:layout_constraintBottom_toBottomOf="parent"
            app:layout_constraintVertical_bias="0.486"
            app:layout_constraintEnd_toEndOf="parent"
            app:layout_constraintStart_toStartOf="parent"/>
    <TextView
            android:text="연봉"
            android:layout_width="236dp"
            android:layout_height="47dp"
            android:id="@+id/user_pay"
            android:textSize="20dp"
            android:gravity="center"
            app:layout_constraintTop_toTopOf="parent"
            app:layout_constraintBottom_toBottomOf="parent"
            app:layout_constraintVertical_bias="0.602"
            app:layout_constraintEnd_toEndOf="parent"
            app:layout_constraintStart_toStartOf="parent"/>

</androidx.constraintlayout.widget.ConstraintLayout>
view_item_layout.xml (main에 전시되는 아이템의 상세구성)
<?xml version="1.0" encoding="utf-8"?>
<androidx.constraintlayout.widget.ConstraintLayout

        xmlns:android="http://schemas.android.com/apk/res/android"
        xmlns:tools="http://schemas.android.com/tools"
        xmlns:app="http://schemas.android.com/apk/res-auto"
        android:layout_width="match_parent"
        android:layout_height="60dp"
        android:layout_margin="5dp">

    <ImageView
            android:id="@+id/img_profile"
            android:layout_width="54dp"
            android:layout_height="54dp"
            android:layout_marginBottom="4dp"
            android:layout_marginStart="8dp"
            android:layout_marginTop="4dp"
            app:layout_constraintBottom_toBottomOf="parent"
            app:layout_constraintStart_toStartOf="parent"
            app:layout_constraintTop_toTopOf="parent"

    />

    <TextView
            android:id="@+id/uerNameTxt"
            android:text="이름"
            android:layout_width="347dp"
            android:layout_height="24dp"
            android:textSize="20sp"
            android:textStyle="bold"

            android:layout_marginStart="16dp" app:layout_constraintStart_toEndOf="@+id/img_profile"
            app:layout_constraintTop_toTopOf="parent" android:layout_marginTop="4dp"/>
    <TextView
            android:id="@+id/payTxt"
            android:text="연봉"
            android:layout_width="wrap_content"
            android:layout_height="20dp"
            android:layout_marginStart="16dp"
            app:layout_constraintStart_toEndOf="@+id/img_profile"
            app:layout_constraintBottom_toBottomOf="parent"
            android:layout_marginBottom="8dp"/>
    <TextView
            android:id="@+id/addressTxt"
            android:text="주소"
            android:layout_width="262dp"
            android:layout_height="20dp"
            app:layout_constraintBottom_toBottomOf="parent"
            android:layout_marginBottom="8dp"
            android:layout_marginTop="4dp"
            app:layout_constraintTop_toBottomOf="@+id/uerNameTxt"
            app:layout_constraintVertical_bias="0.0"
            app:layout_constraintStart_toEndOf="@+id/payTxt"
            android:layout_marginStart="8dp"/>

</androidx.constraintlayout.widget.ConstraintLayout>

DataVo
package com.example.sample30

import android.os.Parcel
import android.os.Parcelable

class DataVo(val name:String?, val id:String?,
			val address:String?, val pay:Int, val photo:String?):Parcelable {
			//Parcelable이라는 안드로이드 os를 상속


    constructor(parcel:Parcel) : this(
     parcel.readString(),
     parcel.readString(),
     parcel.readString(),
     parcel.readInt(),
     parcel.readString()
     ){}

	//Parcelable을 상속해서 오버라이드 해야되는 함수 1
    //입력 받은 값을 세팅하기 위한 함수
    override fun writeToParcel(parcel: Parcel, p1: Int) {
        parcel.writeString(name)
        parcel.writeString(id)
        parcel.writeString(address)
        parcel.writeInt(pay)
        parcel.writeString(photo)

    }

	//Parcelable을 상속해서 오버라이드 해야되는 함수 2
    override fun describeContents(): Int {
        return 0
    }

	//싱글턴 형식
    companion object CREATOR : Parcelable.Creator<DataVo>{
        override fun createFromParcel(parcel: Parcel): DataVo {
           return DataVo(parcel)
        }

        override fun newArray(size: Int): Array<DataVo?> {
            return arrayOfNulls(size)
        }

    }


}
CustomAdapter.kt
package com.example.sample30

import android.content.Context
import android.content.Intent
import android.view.LayoutInflater
import android.view.View
import android.view.ViewGroup
import android.widget.ImageView
import android.widget.TextView
import androidx.recyclerview.widget.RecyclerView
import com.bumptech.glide.Glide

class CustomAdapter(private val context:Context, private val dataList: ArrayList<DataVo>)
	:RecyclerView.Adapter<ItemViewHolder>(){
   	//RecyclerView에 binding 해줄 Adapter를 연결시킨다.

   override fun onCreateViewHolder(parent: ViewGroup, viewType: Int): ItemViewHolder {
        val view = LayoutInflater.from(context).inflate(R.layout.view_item_layout,parent, false)
        return ItemViewHolder(view)

    }

    override fun onBindViewHolder(holder: ItemViewHolder, position: Int) {
        holder.bind(dataList[position], context)
        //recycleView에 있는 각각의 아이템과 아이템의 위치
    }

    override fun getItemCount(): Int {
        return dataList.size
    }

}


class ItemViewHolder(itemView: View) : RecyclerView.ViewHolder(itemView){
    private val userPhoto = itemView.findViewById<ImageView>(R.id.img_profile)
    private val userName = itemView.findViewById<TextView>(R.id.uerNameTxt)
    private val userPay = itemView.findViewById<TextView>(R.id.payTxt)
    private val userAddress = itemView.findViewById<TextView>(R.id.addressTxt)

    //data -> resource (binding)
    fun bind(dataVo: DataVo,context: Context){

        //사진
        if(dataVo.photo != ""){
            val resourceID = context.resources.getIdentifier(dataVo.photo,"drawable",context.packageName)

            if(resourceID > 0){
                userPhoto.setImageResource(resourceID) //제대로 로딩해준 부분
            }else{
                Glide.with(itemView).load(dataVo.photo).into(userPhoto) //다시 로딩을 시켜 아이템을 받는다
            }
        }else{
            userPhoto.setImageResource(R.mipmap.ic_launcher_round) //이미지가 없으니까 아무 이미지나 지원해라
        }

        //TextView 데이터 세팅 작업
        userName.text = dataVo.name
        userPay.text = dataVo.pay.toString()
        userAddress.text =dataVo.address

        // itemView를 클릭시 이벤트 발생
        itemView.setOnClickListener{
            println(dataVo.name+" "+dataVo.photo)

            //ProfileDetailActivity로 이동
            Intent(context,ProfileDetailActivity::class.java).apply {

                //짐을 챙긴다
                putExtra("data",dataVo)

                //짐을 보낸다
                addFlags(Intent.FLAG_ACTIVITY_NEW_TASK) //새로운 액티비티를 추가하라
            }.run { context.startActivity(this) }
        }

    }

}
ProfileDetailActivity
package com.example.sample30

import android.os.Bundle
import android.widget.ImageView
import android.widget.TextView
import androidx.appcompat.app.AppCompatActivity
import com.bumptech.glide.Glide


class ProfileDetailActivity : AppCompatActivity() {

    override fun onCreate(savedInstanceState: Bundle?) {
        super.onCreate(savedInstanceState)
        setContentView(R.layout.activity_profile_datail)

        //짐을 푼다
        val data = intent.getParcelableExtra<DataVo>("data")
        println(data?.name+" "+data?.id)

        val imageView = findViewById<ImageView>(R.id.img_profile)
        val userId = findViewById<TextView>(R.id.user_id)
        val userName = findViewById<TextView>(R.id.user_name)
        val userPay = findViewById<TextView>(R.id.user_pay)

        //imageView에 data?.photo 명의 이미지를 드로잉하라(로드하라)
        Glide.with(this).load(getImage(data?.photo)).into(imageView)

        userId.text =data?.id
        userName.text = data?.name
        userPay.text = data?.pay.toString()
    }

    fun getImage(imageName:String?):Int{
        return resources.getIdentifier(imageName,"drawable",packageName) //packageName = drawable
    }


}
MainActivity
package com.example.sample30
import androidx.appcompat.app.AppCompatActivity
import android.os.Bundle
import androidx.recyclerview.widget.LinearLayoutManager
import androidx.recyclerview.widget.RecyclerView
import java.util.*
class MainActivity : AppCompatActivity() {
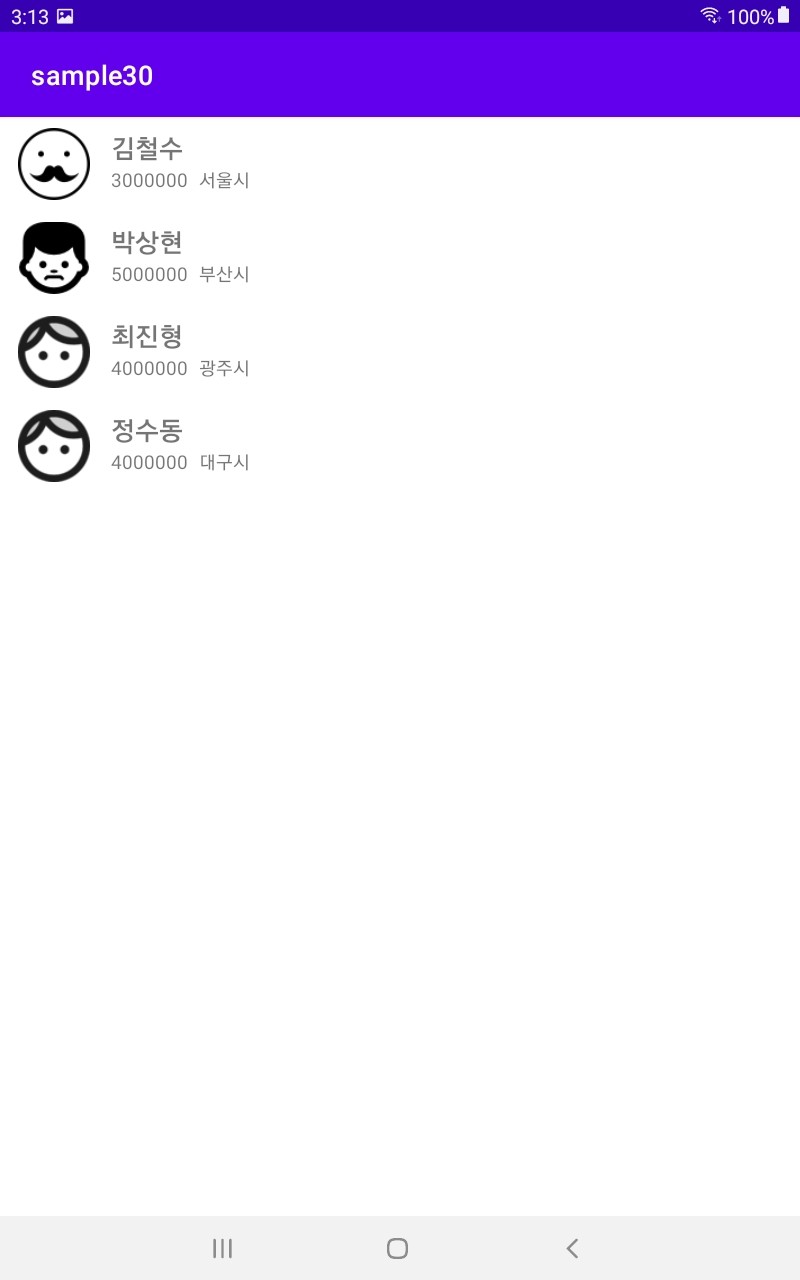
var userList = arrayListOf<DataVo>(
DataVo("김철수","kcs","서울시",3000000,"kim"),
DataVo("박상현","psh","부산시",5000000,"park"),
DataVo("최진형","cjh","광주시",4000000,"choi"),
DataVo("정수동","jsd","대구시",4000000,"choi"),
)
override fun onCreate(savedInstanceState: Bundle?) {
super.onCreate(savedInstanceState)
setContentView(R.layout.activity_main)
var recycleView = findViewById<RecyclerView>(R.id.recyclerView)
val mAdapter = CustomAdapter(this,userList)
recycleView.adapter = mAdapter
val layout = LinearLayoutManager(this)
recycleView.layoutManager=layout //recycler 뷰에 리니어 레이아웃 적용
recycleView.setHasFixedSize(true)
}
}
실행화면

'코딩 기록 > Kotlin' 카테고리의 다른 글
| Kotlin 코틀린 문장 입력하면 출력하는 안드로이드 프로그램 만들기 / BufferedReader / OutputStreamWriter 이용 / 파일 입출력 (0) | 2022.02.10 |
|---|---|
| Kotlin 코틀린 random 넘버와 spinner 이용한 안드로이드 야구 게임 만들기 (0) | 2022.02.10 |
| kotlin BooleanArray, Math.random 이용하여 중복되지 않는 랜덤 번호 골라주는 함수 만들기 (0) | 2022.02.08 |
| kotlin 코틀린 안드로이드 화면에 이미지 버튼 구현하기, 버튼 클릭시 알림창 뜨게 하기 (0) | 2022.02.08 |
| 코틀린 Kotlin seekbar / ratingbar (별점) 안드로이드 화면에 나타내고 textview랑 연결하기 (0) | 2022.02.08 |
'코딩 기록/Kotlin' Related Articles
more


Comments