
Notice
Recent Posts
Recent Comments
Link
| 일 | 월 | 화 | 수 | 목 | 금 | 토 |
|---|---|---|---|---|---|---|
| 1 | 2 | 3 | 4 | 5 | 6 | |
| 7 | 8 | 9 | 10 | 11 | 12 | 13 |
| 14 | 15 | 16 | 17 | 18 | 19 | 20 |
| 21 | 22 | 23 | 24 | 25 | 26 | 27 |
| 28 | 29 | 30 |
Tags
- nodejs
- 랜덤번호
- TextView
- React
- GoogleMaps
- array
- Android
- Hook
- 자바스크립트
- JS
- 안드로이드
- 오버라이딩
- JavaScript
- Java
- Kotlin
- Javscript
- 코틀린
- 랜덤넘버
- 구글맵스
- button
- stylesheet
- TypeScript
- RecyclerView
- 리액트
- SpringBoot
- npm
- scrollview
- 스프링부트
- fragment
- Linux
Archives
- Today
- Total
타닥타닥 개발자의 일상
Kotlin 코틀린 입력 받은 값을 다음 화면으로 넘길수 있도록 android 화면 만들기 / pref함수 사용 / startActivity 사용 본문
카테고리 없음
Kotlin 코틀린 입력 받은 값을 다음 화면으로 넘길수 있도록 android 화면 만들기 / pref함수 사용 / startActivity 사용
NomadHaven 2022. 2. 10. 21:55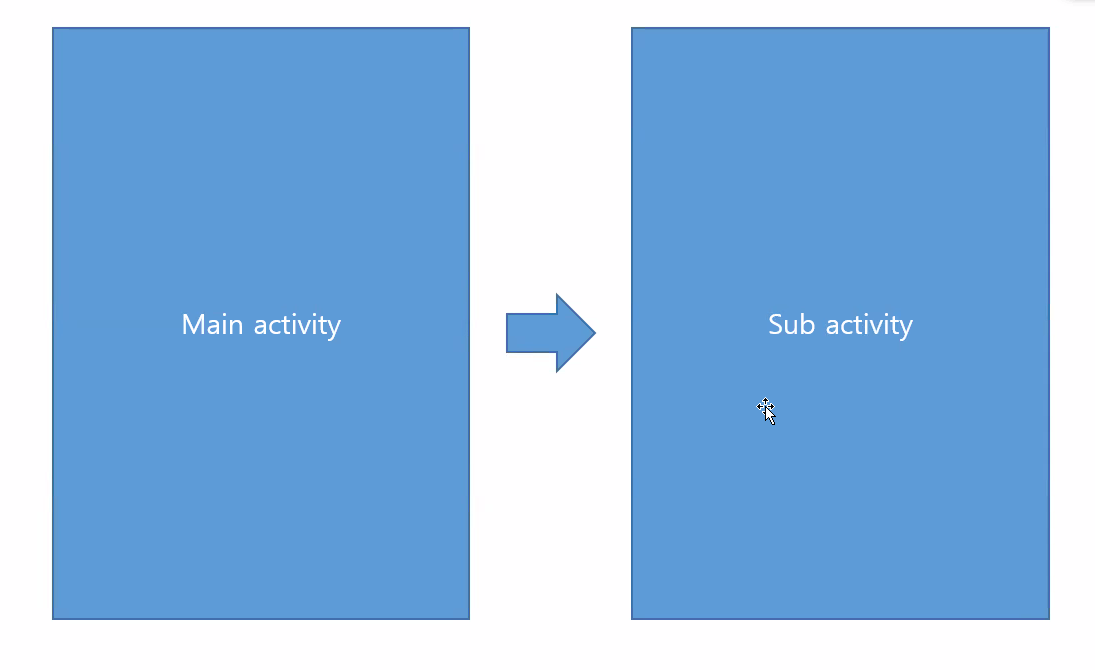
폴더 및 파일 구성
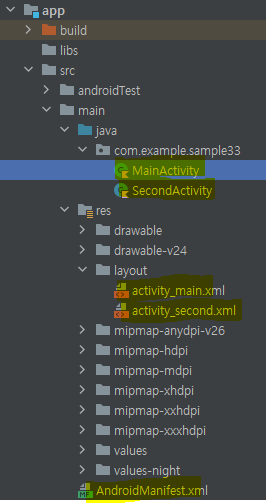
com.example.sample33 폴더 우클릭 > 새로 만들기 > Activity > Empty Activiy 선택 > SecondActivity 만들기.
이런 경로로 Activity를 만들면 AndroidManifest.xml에도 자동으로 Activity가 등록되고 layout에 xml파일도 자동으로 생긴다.
AndroidManifest.xml에 자동 등록된 SecondActivity에 대한 내용
<activity
        android:name=".SecondActivity"
        android:exported="true"/>
activity_main.xml
<?xml version="1.0" encoding="utf-8"?>
<androidx.constraintlayout.widget.ConstraintLayout
        xmlns:android="http://schemas.android.com/apk/res/android"
        xmlns:tools="http://schemas.android.com/tools"
        xmlns:app="http://schemas.android.com/apk/res-auto"
        android:layout_width="match_parent"
        android:layout_height="match_parent"
        tools:context=".MainActivity">
    <EditText
            android:layout_width="465dp"
            android:layout_height="97dp"
            android:inputType="textPersonName"
            android:ems="10"
            android:id="@+id/editText"
            app:layout_constraintTop_toTopOf="parent"
            app:layout_constraintBottom_toBottomOf="parent" app:layout_constraintEnd_toEndOf="parent"
            app:layout_constraintStart_toStartOf="parent" app:layout_constraintHorizontal_bias="0.459"
            app:layout_constraintVertical_bias="0.117"/>
    <Button
            android:text="프리퍼런스 쓰기"
            android:layout_width="476dp"
            android:layout_height="85dp" android:id="@+id/write"
            app:layout_constraintTop_toBottomOf="@+id/editText"
            app:layout_constraintBottom_toBottomOf="parent" app:layout_constraintEnd_toEndOf="parent"
            app:layout_constraintStart_toStartOf="parent"
            app:layout_constraintVertical_bias="0.084"/>
    <Button
            android:text="다음 화면으로 이동"
            android:layout_width="476dp"
            android:layout_height="85dp" android:id="@+id/move"
            app:layout_constraintTop_toBottomOf="@+id/editText"
            app:layout_constraintBottom_toBottomOf="parent" app:layout_constraintEnd_toEndOf="parent"
            app:layout_constraintStart_toStartOf="parent"
            app:layout_constraintVertical_bias="0.28"/>
</androidx.constraintlayout.widget.ConstraintLayout>
activity_second.xml (SecondActivity와 연결된 곳)
<?xml version="1.0" encoding="utf-8"?>
<androidx.constraintlayout.widget.ConstraintLayout
        xmlns:android="http://schemas.android.com/apk/res/android"
        xmlns:tools="http://schemas.android.com/tools"
        xmlns:app="http://schemas.android.com/apk/res-auto"
        android:layout_width="match_parent"
        android:layout_height="match_parent"
        tools:context=".SecondActivity">

    <TextView
            android:id="@+id/textView"
            android:text="TextView"
            android:textSize="30dp"
            android:layout_width="424dp"
            android:layout_height="124dp"
            app:layout_constraintTop_toTopOf="parent"
            app:layout_constraintBottom_toBottomOf="parent"
            app:layout_constraintEnd_toEndOf="parent"
            app:layout_constraintStart_toStartOf="parent"
            app:layout_constraintVertical_bias="0.269"/>
    <Button
            android:text="프리퍼런스 읽기"
            android:layout_width="431dp"
            android:layout_height="90dp" android:id="@+id/read"
            app:layout_constraintTop_toBottomOf="@+id/textView"
            app:layout_constraintBottom_toBottomOf="parent" app:layout_constraintEnd_toEndOf="parent"
            app:layout_constraintStart_toStartOf="parent" app:layout_constraintHorizontal_bias="0.52"
            app:layout_constraintVertical_bias="0.14"/>
</androidx.constraintlayout.widget.ConstraintLayout>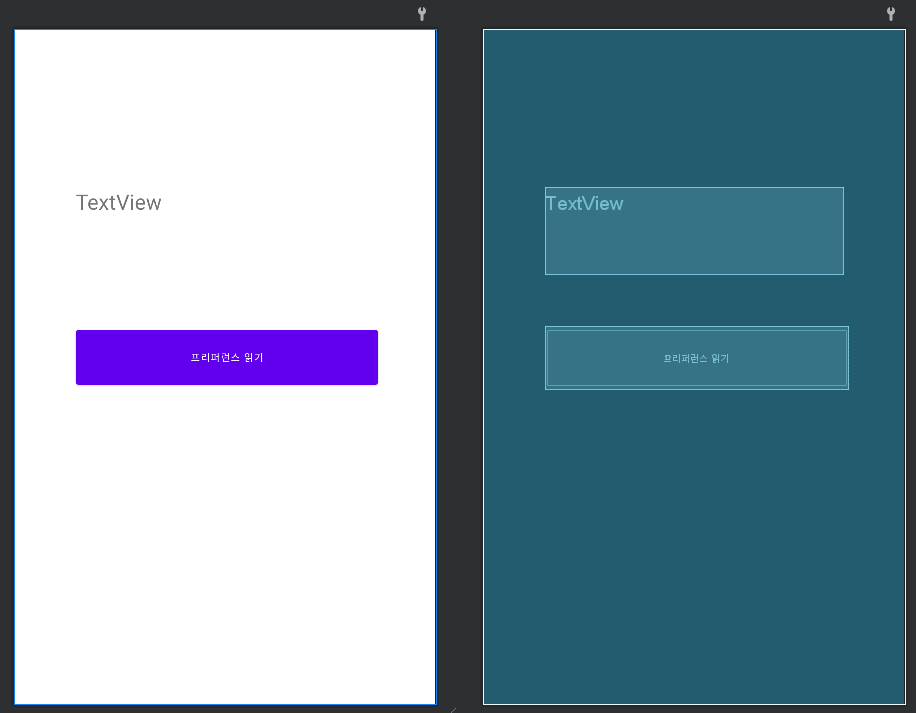
MainActivity.kt
package com.example.sample33

import android.content.Intent
import androidx.appcompat.app.AppCompatActivity
import android.os.Bundle
import android.widget.Button
import android.widget.EditText

class MainActivity : AppCompatActivity() {
    override fun onCreate(savedInstanceState: Bundle?) {
        super.onCreate(savedInstanceState)
        setContentView(R.layout.activity_main)

        val write = findViewById<Button>(R.id.write)
        val move = findViewById<Button>(R.id.move)

        val edit = findViewById<EditText>(R.id.editText)

        write.setOnClickListener {
            val pref = getSharedPreferences("pref", MODE_PRIVATE)
            //MODE_PRIVATE 이전에 입력된 내용에 덧 씌우기. 즉 새로운 내용이 입력되면 이전내용 삭제.

            val editor = pref.edit()
            //입력된 값을 pref로 지정

            editor.putString("mydata",edit.text.toString())
            //pref 값을 mydata라는 사용자 지정 변수로 명명. 입력된 값을 문자열로 변환.
            editor.commit()

            edit.setText("") //입력한 내용을 지운다.
        }
        move.setOnClickListener{
            val i = Intent(this,SecondActivity::class.java)
            startActivity(i)
            //secondActivity로 이동
        }
    }
}
SecondActivity.kt
package com.example.sample33

import androidx.appcompat.app.AppCompatActivity
import android.os.Bundle
import android.widget.Button
import android.widget.TextView

class SecondActivity : AppCompatActivity() {
    override fun onCreate(savedInstanceState: Bundle?) {
        super.onCreate(savedInstanceState)
        setContentView(R.layout.activity_second) //activity_second!

        val read = findViewById<Button>(R.id.read)
        val textView = findViewById<TextView>(R.id.textView)

        read.setOnClickListener {
            val pref = getSharedPreferences("pref", MODE_PRIVATE)
            //MainActivity에서 받은 pref를 가져온다.

            textView.text = pref.getString("mydata","")
            //peft에 있는 mydata라는 이름의 데이터를 받고, 데이터를 textView에 출력한다.

        }
    }
}
실행화면


Comments